Quickstart Guide
🚀 Quickstart Guide
Welcome to the Lumanu Payment API! This guide will walk you through authenticating and making your first API call.
We use the OAuth 2.0 Client Credentials flow to ensure secure communication. This is a two-step process:
- Exchange your Client ID and Client Secret for a temporary
access_token. - Use that
access_tokento make requests to the Lumanu API.
Prerequisites
Before you begin, you will need:
- Your Client ID and Client Secret: These are your unique credentials for authentication.
- A Workspace ID: You'll need the unique identifier for the workspace you want to create a payout for
- A command-line tool like cURL or a graphical API client like Postman.
Step 1: Get Your Credentials
Once we begin our integration, Lumanu will provide API credentials consisting on a Client ID and Client Secret. Treat your Client Secret like a password and keep it confidential.
During the integration onboarding, Lumanu will create workspaces to test with. You can retrieve the ID for these on the Settings -> Integrations page:
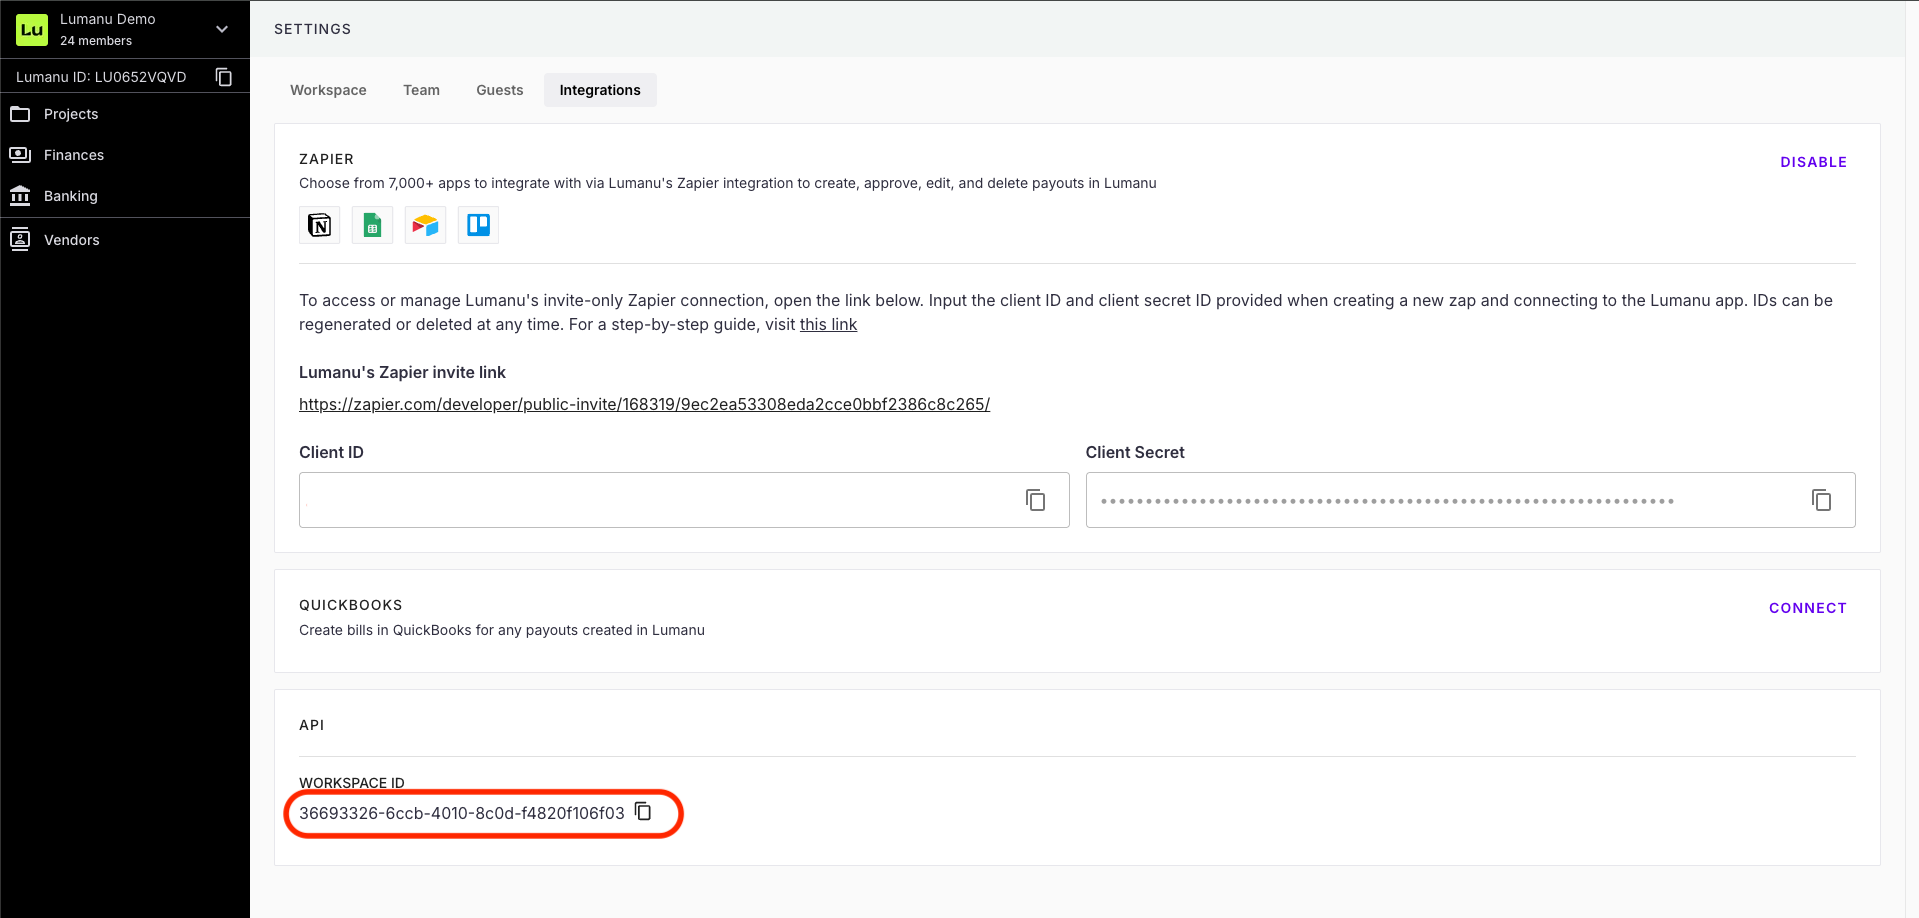
(Note that the Client ID and Client Secret for the Zapier integration is not the same as the API credentials)
Step 2: Request an Access Token
Next, you need to exchange your credentials for a temporary access token. This token proves that your application is authorized to make API requests. Access tokens are valid for a limited time (e.g., 1 hour).
Use the following cURL command to request a token. Replace {YOUR_CLIENT_ID} and {YOUR_CLIENT_SECRET} with your actual credentials.
curl --request POST \
  --url https://auth-staging.lumanu.com/oauth/token \
  --header 'content-type: application/json' \
  --data '{
    "client_id":"{YOUR_CLIENT_ID}",
    "client_secret":"{YOUR_CLIENT_SECRET}",
    "audience":"https://lumanu-demo.hasura.app/v1/graphql",
    "grant_type":"client_credentials"
  }'
The response will be a JSON object containing your access_token:
{
  "access_token": "eyJhbGciOiJIUzI1NiIsInR5cCI6IkpXVCJ9...",
  "token_type": "Bearer"
}
Copy the access_token value from the response for the next step.
Step 3: Make Your First API Request
Now that you have an access token, you can make requests to the API. We will use the POST /api/rest/payable endpoint to create a payout in the workspace.
In the Authorization header, use the access_token you received in the previous step. Remember to replace {YOUR_ACCESS_TOKEN} and {YOUR_WORKSPACE_ID}.
curl --request POST \
  --url https://api.lumanu.com/api/rest/payables \
  --header 'Authorization: Bearer {YOUR_ACCESS_TOKEN}' \
  --header 'Content-Type: application/json'
	--data '{
    "workspace_id": "{YOUR_WORKSPACE_ID}",
    "payee_email": "[email protected]",
    "amount": 100,
    "description": "My first payout via the API"
  }'
Step 4: Understand the Response
If the request is successful, the API will return a JSON object with details about the payout:
{
  "id": "32b1b9dd-2b0f-4cf0-92f7-6416a3be23b9",
  "amount": 100,
  "amount_denomination": "us_cents",
  "description": "My first payout via the API",
  "due_date": null,
  "invoice_number": 206466,
  "vendor_status": "Awaiting signup",
  "vendor_display_name": null,
  "vendor_email": "[email protected]",
  "status": null,
  "workspace_id": "90413206-0be5-48a5-af6c-6d52f3ec69f6",
  "created_at": "2025-09-17T15:57:04.482673+00:00",
  "updated_at": "2025-09-17T15:57:04.482673+00:00",
  "payee_lumanu_id": null,
  "custom_fields": []
}
Key fields:
id- This is the identifier in Lumanu of the payout. You can use this in subsequent API calls to retrieve this payout againamount- This is the amount in the workspace's selected currency (specified inamount_denomination)description- This the description of the payout that you specified in the first request. This will be visible to the payee.invoice_number- This is a unique invoice number that will be shown on the PDF for the payoutvendor_status- This shows the status of the vendor you are attempting to pay (in this case[email protected]) in the Lumanu system. In this case, we are waiting for them to sign up and onboard to the platform.vendor_display_name- Once the vendor does sign up, this will be populated with a display name you can use in your system for that vendor.status- Payouts can progress through multiple statuses on the way to being disbursed. When they are initially created this will benull. More details about statuses are covered in Core concepts.payee_lumanu_id- The Lumanu ID is a unique alphanumeric string that you can use as an identifier for vendors that is more robust and permanent than email addresses. This will be generated once the vendor goes through the onboarding and verification process in Lumanu.
Congratulations! You've successfully authenticated and made your first call to the Lumanu API.
Next Steps
- Automate Token Refresh: Remember that access tokens expire. You should build logic into your application to request a new token before the old one expires.
- Query a Payout: Learn how to retrieve the new payout you've created by exploring the
GET /api/rest/payoutsendpoint in our API Reference. - Explore our Guides: Dive deeper into specific use cases, like onboarding new creators or automating your payment workflows.
Updated 6 months ago